Tutoriel N° 247
How To Create A Bootable Rescue USB For Windows
When your system is so corrupt with malware that it becomes unstable or wont even boot, a bootable rescue CD or USB can be very useful. A rescue CD or USB works by allowing you to launch an operating system or application directly from the CD or USB so you don't need Windows to be running on your PC. From Bootable Rescue CD or USB you can then access your hard drive and all your files. In this tutorial we will show you how to create a Bootable Rescue USB with Windows 7 and some crucial applications which can be very handy when you system stuck.

To get started follow steps below
Step 1: First thing what we gone do is install the boot loader. For our purpose we are gone use Grub4DOS boot loader. From below download all three files, unpackand add them to your desktop:
Download grub4dos 0.4.4
Download grubinst 1.0.1
Download Memdisk
Step 2: Format your USB Drive. To do that go to My Computer, right click on your USB drive and from context menu choose Format.
Step 3: Now we will install grub4dos boot loader. From your desktop run grubinst_gui.exe installer which you did previously downloaded
Step 4: Once you run grubinst_gui.exe installer you will get a small window which you can see in below image
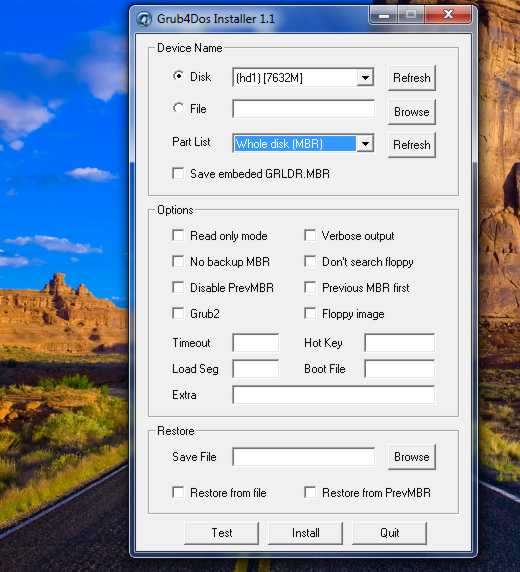
Step 5: From this window, as a Disk set your USB drive (In my case its (hd1) [7632M] )
Step 6: Right next to Part List drop down menu click Refresh and then from dropdown list select Whole disk (MBR)
Step 7: Finally click Install button
Step 8: Now go to grub4dos 0.4.4 folder (The .zip you did download at the beginning of this tutorial) and copy following files memdisk, grldr and menu.lst into the root directory of the USB drive.
Step 9: Open menu.lst file from your USB drive with Notepad. For those who dont know menu.lst file creates the menu you will choose from which program to boot.
Step 10: Since most of stuff inside menu.lst file we wont need remove everything and add following 3 lines:
color black/cyan yellow/cyan
timeout 30
default /default
timeout 30
default /default
Note: For every program that you want to install on USB drive it needs to have an entry inside menu.lst file so that grub4dos knows which program to load and how to do it. Let me give you an example how it works in next step.
Step 11: For this purpose I am gone install MemTest86+ on USB drive. First download Pre-Compiled Bootable Binary of MemTest86+
Step 12: Unpack downloaded file and upload memtest.bin file to your USB drive
Step 13: Open menu.lst file from your USB drive with Notepad and add below lines
title MemTest86+
kernel /memtest.bin
kernel /memtest.bin
Step 14: Next time you boot from USB drive you will get MemTest86+ as an option in the boot loader.
For every other software or Windows that you want to boot from USB drive simple upload its installation or .iso file on your USB drive and write a instructions inside menu.lst file so grub4dos knows which program to load. I hope this gave you a clear picture how to create a bootable rescue USB.